Advanced CLI users
Before we start
This tutorial is aimed at advanced users who are already familiar with using the open-source RiskScape Engine Command Line Interface (CLI). We expect that you:
Have gone through the Navigating project files tutorial and are comfortable using WebDAV.
Have a Platform user account and have access to the Getting Started Platform project
Have the latest version of the RiskScape CLI Engine installed locally on your computer.
Tip
If you do not already have the RiskScape CLI Engine installed, follow the RiskScape Engine Installation instructions. We recommend that you also go through the RiskScape Engine getting started guide to familiarize yourself with running models on the command-line.
This tutorial will walk you through how to take a project in the RiskScape Platform and run it locally. You may want to do this in order to:
try out changes to your model locally, before you update the RiskScape Platform project.
be prepared for internet connectivity problems that may occur alongside a natural disaster. For example, you could potentially run a post-event model locally on your laptop, even if your internet was knocked out by the natural disaster.
➡ Actions you need to do yourself will begin with an arrow, like this paragraph.
Commands you need to run in your command prompt will look like this:
riskscape --help
Initial setup
➡ Open a new command prompt and check that the riskscape command works. E.g.
riskscape --version
Tip
In the Windows Command Prompt, you can use Ctrl + c and Ctrl + v
to copy and paste commands.
➡ Check that you have a WebDAV connection setup for the ‘Getting started’ project in the RiskScape Platform - if not, then follow the Connecting using WebDAV instructions.
Copying a model
➡ Create a new directory on your computer where you will store the ‘Getting started’ RiskScape Platform project.
For example, C:\RiskScape\Projects\getting-started-platform.
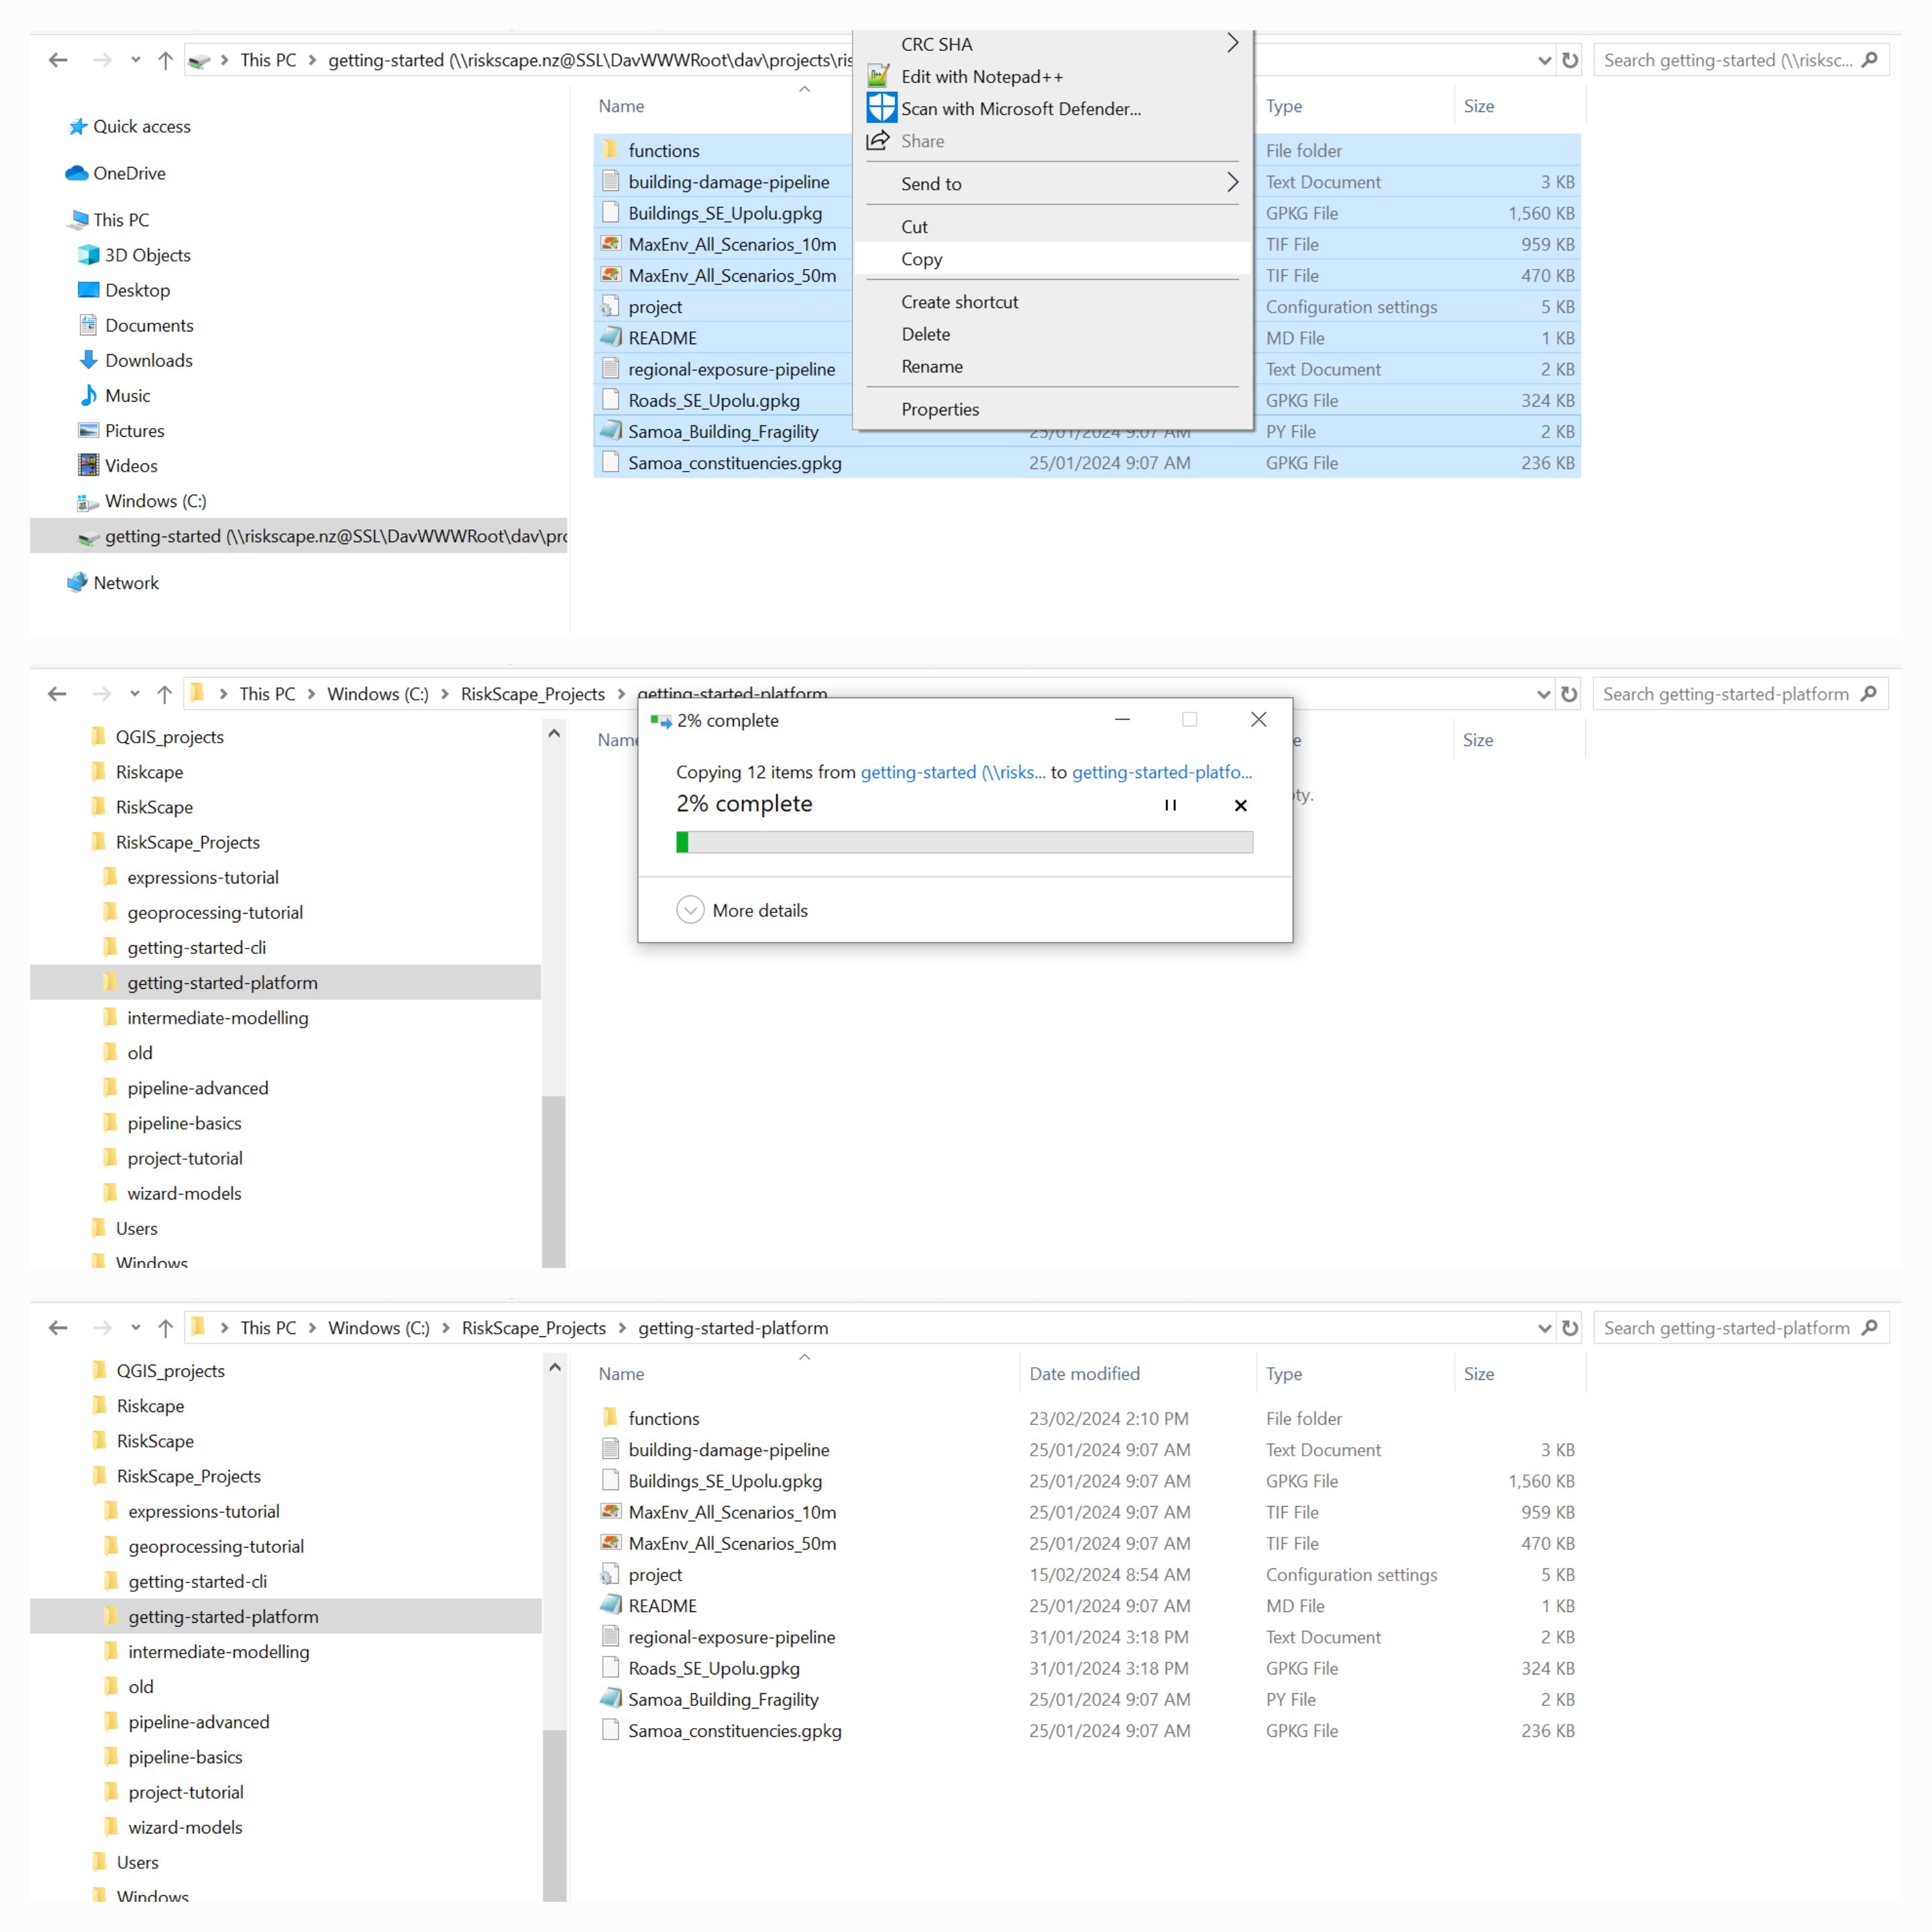
➡ Using your computer’s file explorer copy and paste the files from the mapped WebDAV drive into the new directory you just created. The whole process should look something like the following composite image:

Running the model
You should now have a local copy of all the project files.
➡ In your command prompt, use the cd command to change directories to the local directory where you copied the files, e.g.
cd C:\RiskScape\Projects\getting-started-platform
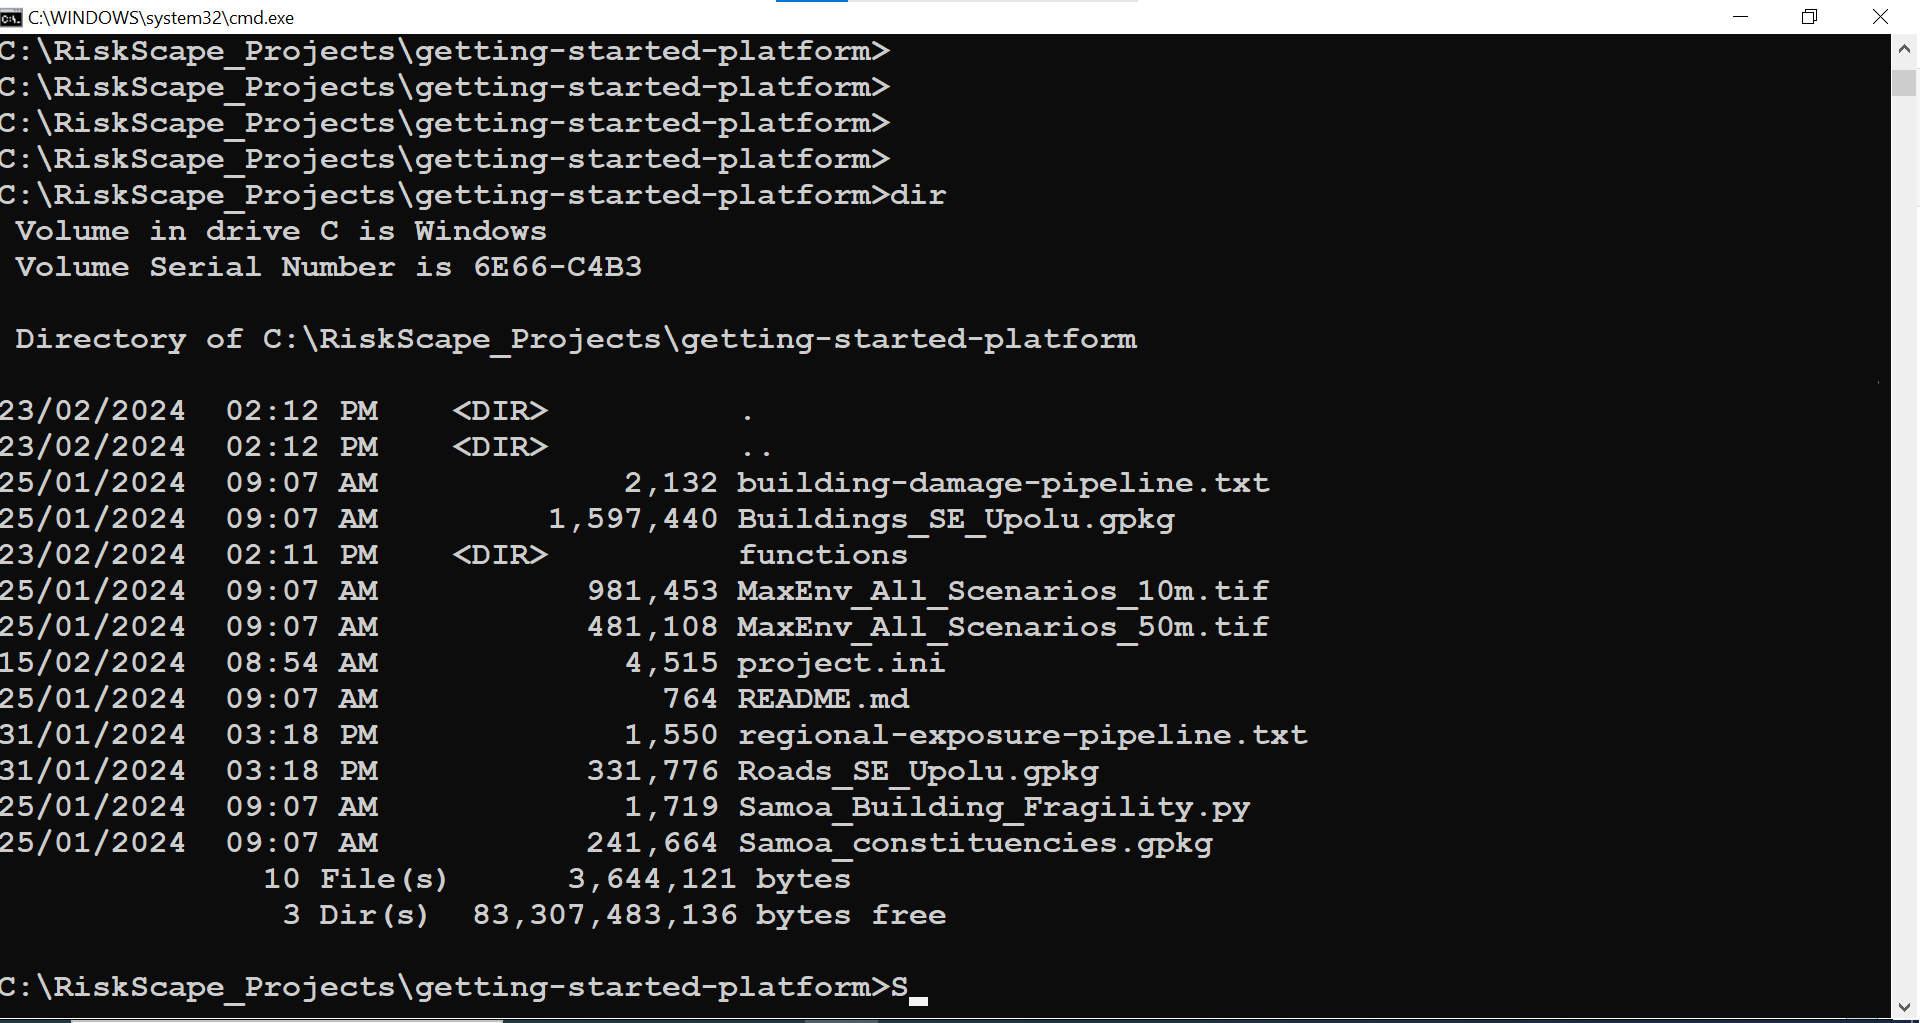
➡ In your command prompt, use the dir command to double-check the project files are present.
It should look something like the following:

Tip
The most important thing is that there should be a project.ini file present in the output.
The RiskScape CLI Engine always looks for the project.ini file in the current directory.
Now try running the ‘Total-exposed’ model by entering the following into your command prompt:
riskscape model run Total-exposed
When the model runs successfully, it will create output files in a
output\Total-exposed\<TIMESTAMP> sub-directory.
The results files created will also be displayed in your command prompt.
➡ In your file explorer, navigate to the output sub-directory and find the
summary.csv and event-impact.geojson files that were created.
The summary.csv model results should look like this:

You now have a local copy of the model that you can modify and run independently of the RiskScape Platform.
Changing model parameters
The command to run a model with the default parameters is fairly straight-forward. However, changing the model parameters is harder to do on the CLI.
➡ Copy and paste the following command into your command prompt. This will run the model with the 50m grid hazard-layer GeoTIFF instead of the default 10m grid.
riskscape model run Total-exposed -p "hazard_layer=MaxEnv_All_Scenarios_50m.tif"
Try opening the summary.csv results file that was produced and check that the results have now changed.
Tip
The RiskScape CLI Engine documentation has more examples of
how to change model parameters.
Alternatively, you may find it easier to simply modify the default parameter values directly
in your copy of the project.ini file. The project.ini typically contains the models and
parameters (e.g. param.hazard_layer) for a project.
Copying other Platform projects
Note
You should consider the below points carefully before you use this approach to copy other projects that you might belong to in the RiskScape Platform.
Some RiskScape Platform projects may involve a licensing agreement with another organization that owns the model data. Such legal agreements may preclude you from copying specific data or using it outside of the RiskScape Platform. In general, you should check with the organization who owns the RiskScape Platform project before you take a local copy.
Taking a copy of a RiskScape Platform project may incur download costs for your organization. If your project involves many gigabytes of data, then you may want to minimize the number of times you take local copies of a RiskScape Platform project.
Your local project may become out of date over time. Any changes made to the RiskScape Platform project will not be reflected in the local copy that you have. This may mean that you end up using old input data or out-of-date modelling science.
Tip
If you are a project admin copying a project so that you can work on it locally, you should take
care when copying your changes back to the RiskScape Platform. You should avoid copying
any output directories that may have gotten created locally. Also note that if
other project admin users are also modifying the project concurrently, then some changes may get lost
(using a version control system, such as git can help in this case).
.